Posted on Leave a comment

My Typical Green Juice Combo

To all those green juice addicts out there you’ll understand my sentiments here. I am a green juice addict. But with all habit forming activities this one took a while to set in. I remember (not so long ago) coming home from work and pouring myself a a big fat gin and tonic (with 3 large ice cubes and a hefty slice of lemon). I’d sit down and watch the SBS or ABC news every night with my ‘relaxant’. Far out I loved that little routine.

I thought about that tonight when I came inside from the routine afternoon dog walk. How things have changed. These days there is something about the greenness of these green juices, the thought of the goodness running through my veins that keeps me coming back for more (I promise if this addiction happened to me, it could happen to anyone!). This evening I marched straight to the fridge, pulled out bundles of chilled greens and commenced my 5.30pm (ish) green juicing routine.


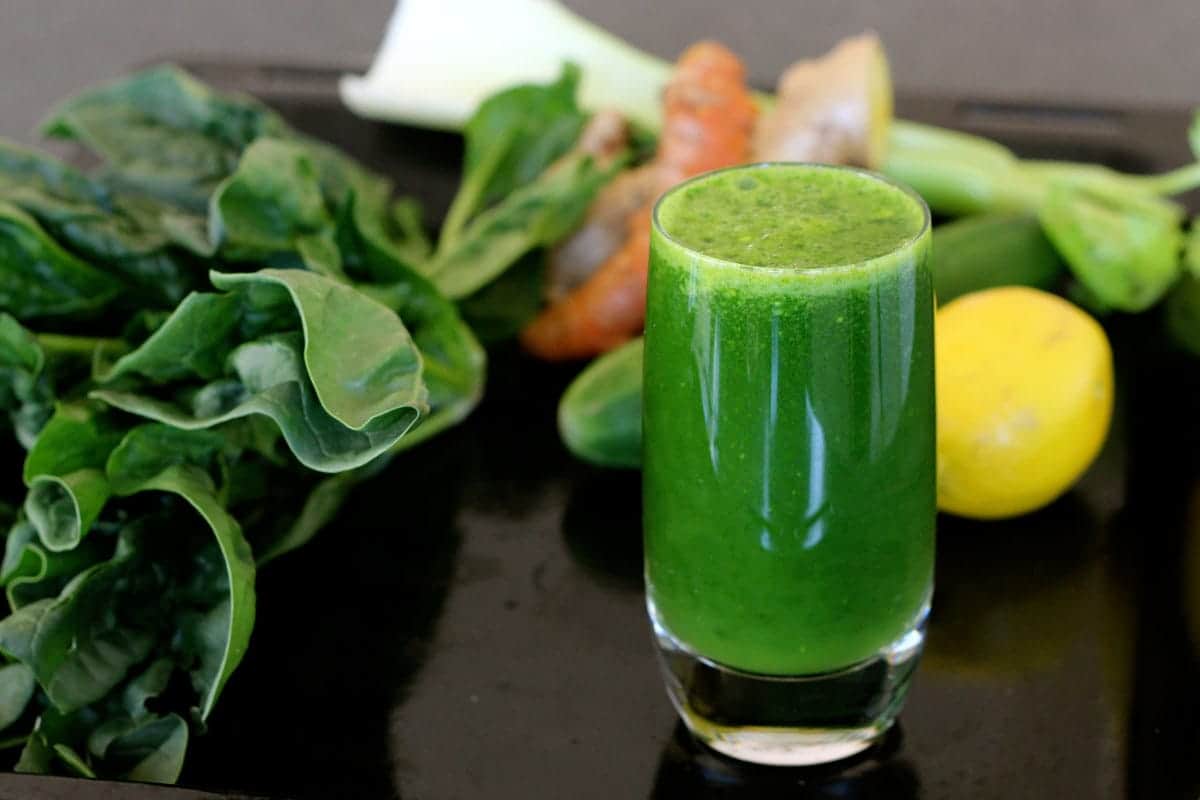
So you can throw anything green in a green juice, you can also throw lemon in green juice (which I recommend if you are new to green juices, it softens the flavour). It just needs to be raw (obviously), pesticide free, ideally organic and fresh (it’s all well and good to juice your veg because they’re going soft in the chiller but let’s be honest, soft veg is lacking in the nutrients department). Green juices are seriously one of the best things you can do for your health.

You’ll need:
1/2 bunch english spinach
1 or 2 stalks silver beet and kale
1 stalk celery
Handful of parsley & mint (if you’ve got it)
1 lemon
1/2 cucumber
1 knob of ginger (to taste)
1 small piece of turmeric
1 clove garlic

Throw it all in the juicer and press play. Voila!

Source: theholisticingredient.com

Posted on Leave a comment

Egg Salad Wrap

I honestly think the one meal I miss the MOST since being diagnosed with a wheat intolerance about seven years ago is a beautiful fresh salad roll or sandwich. The whole combo of fresh multi-grain bread and beautiful fresh salad (and ham off the bone if at Christmas time) was hard to beat. But when ingredients are omitted from your diet there is always a silver lining…if you just take the time to think outside the bread bin/box. I have become very sensitive to my body’s daily fuel requirements and it’s clear to me that I need good quality protein in at least two of my meals each day. Eggs (or ‘magic bullets’) and I have a very close relationship and are my very favourite protein source. So I would like to share the recipe for my anti-bread salad wrap. Don’t blink or you really will miss it.

Give two eggs a really good whisk or beat. Finely chop a heaped teaspoon of parsley and mix into the eggs with a little salt and pepper. Heat oil (I use coconut oil) in a small omelette pan. Once the pan is hot pour in the eggy mixture and whirl it around the pan. As the edges are just drying, with your spatula drag the mixture into the centre allowing the wet egg mixture to fall to the sides. Do this around the pan until it looks almost cooked. Then flip the omelette over and cook the other side, for about 1-2 minutes. Turn onto a plate and lay along one end your chopped salad ingredients. Then very carefully roll your wrap up, cut in half and hey presto – an eggy wrap!

You can add whatever salad ingredients you like but I suggest the following are essential additions: chopped cherry tomatoes, avocado, herbs (heaps and any!), rocket or spinach.

Enjoy x

Source: theholisticingredient.com

Posted on Leave a comment

Spicy Sardine, Cherry Tomato & Coriander Open Sandwich

spicy-sardine-open-sandwich

About five months ago I started eating sardines, for the first time in my young (ish ;-)) life. I wasn’t fed them as a child and they’re certainly not appealing on face value so I was happy to keep them at arms length. Irrespective, there is little fish in my diet. I eat a piece of farmed salmon once a month and canned wild red Alaskan salmon every couple of weeks. I eat the farmed salmon purely to give me variety, not because of it’s nutritional value (of which I believe there is little?) and because it is likely to have a lower mercury content than a lot of non-farmed, large fish. I wrote a post about my fish intake here, but if you’ve not got time to take a look at that I rarely eat fish because of it’s mercury content and terrible trouble with heavy metals in my system.

Roast-Chicken

Why then would I starting eating sardines you may ask? Well it’s simple, and goes a bit like this: big fish eat smaller fish eat smaller fish eat smaller fish…got it?!  On that basis, BIG fish have a high mercury content because of all the smaller fish they’ve consumed (I will not touch tuna as a result). Little fish, like sardines and anchovies have a lower mercury count and are therefore a healthier option for those of us needing to be extra special careful. And other sweeteners? Sardines are one of the highest sources of Omega-3, are an excellent source of B12, a rich source of Vitamin D and  packed with protein. That’ll do me!

yogurt-love

It was during a visit to my local organic store Plump

that I discovered the organic sardines and a recipe kindly shared over the counter by a very helpful staff member (not sure I’ve got it 100% right but it’s pretty good regardless, if I don’t mind saying so myself).

You don’t have to have this on bread (gluten free or otherwise), but it’s definitely a great combo and is pretty much the only time I eat this beautiful sprouted bread/toast (which is by ‘Pure Life’ by the way, you’ll find it in the fridge of most health stores in Australia).

You’ll need:
1 slice of toasted bread of choice
1/2 can organic sardines
Approximately 6 cherry tomatoes, halved
A good handful of coriander leaves, roughly chopped
A good handful of parsley, roughly chopped (note, I used rocket in this photo, had run out of parsley damn it)
1 spring onion, finely chopped
A heaped teaspoon (or two) of capers, rinsed
1/2 teaspoon harissa paste or a sprinkling of dried chilli flakes
Drizzle of extra virgin olive oil (optional)
Salt & Pepper

Roughly mix the harissa through the sardines, not mushing them completely but enough so that the harissa assimilates. Mix through the remaining ingredients and tumble over a piece of toast. Grab a knife and fork, turn the TV off, put the newspaper away, and enjoy a mindful, relaxed and very easy lunchtime treat.

P.S if my friendly Plump recipe sharer has any tips/alterations to this recipe I’m all ears! Thank you for sharing!

Source: theholisticingredient.com

Posted on Leave a comment

Vanilla Infused Sesame Seed Milk

vanilla-infused-sesame-milk

Makes: about 3 cups of milk and a large cup of sesame pulp.

Every single thing happens for a reason; there is a blessing in every challenge; always see the positive in the negative….I could go on all morning! The point here is that my Vanilla infused sesame seed milk is indeed a blessing from a challenge…that being I purchased the hugest bag of sesame seeds recently (self service, got a bit carried away), got home and wondered on earth I was going to do with all of these little seeds. I’m not talking 1/2 cup here, I had about 6 cups – now that’s a challenge! So, I put my thinking cap and Hey Presto! We have this lovely creamy, vanilla infused, dairy and nut-free milk.

Firstly though, let’s not ignore the humble sesame seed and it’s nutritional value. It may be tiny but my goodness it packs a punch (it also turns into tahini…..and oh my goodness me, my teaspoon LOVES a bit of tahini).

Sesame seeds are a great source of manganese, copper (which provides relief from rheumatoid arthritis), calcium (helps prevent PMS, colon cancer, osteoporosis), magnesium (supports vascular and respiratory health), iron, phosphorous, vitamin B1, zinc (supports bone health) and dietary fibre. Significantly they also contain two unique substances called sesamin and sesamolin which have been shown to have a cholesterol lowering effect in humans. Sesamin is also said to help protect the liver from oxidative damage.

You’ll need:
1 cup sesame seeds, soaked overnight in water
4 cups filtered water
Seeds of one vanilla pod
Sweetener of choice, to taste (I used 2 heaped teaspoons maple syrup)
Pinch of sea salt

Throw all of the above ingredients in your high powered blender and blend for 1-2 minutes, depending on the quality of your blender. You want it to be really smooth. Pour the mixture through a nut bag or strainer into a bowl, straining really well until you get all the liquid out of the pulp. Store in the fridge in an air tight bottle or jug for 3-5 days. The pulp can be dehydrated and used as meal (as you would almond meal…I’ll post a recipe for this next week). You could also add it to porridge, soups etc.

If you would prefer your pulp not to have a vanilla flavour, don’t hesitate to make the milk without the vanilla and sweetener, strain it and then pop the milk back into your blender with those ingredients. If you choose to heat this for a hot drink I discovered yesterday that it doesn’t curdle (like my almond milk does). Perfect!

Source: theholisticingredient.com

Posted on Leave a comment

Quinoa Porridge Infused with Chai Tea and Orange

quinoa-infused-with-orange-and-chai

Serves: 3

I do believe this is now the sixth quinoa recipe I have posted – clearly I hold it in very high esteem. Here’s hoping I am not the quinoa Lone Ranger because this is a beautiful take on the Steaming Hot Quinoa porridge which has undoubtedly been one of the most popular recipes on this blog.

You’ll need:
1 cup quinoa, well rinsed
2 cups of chai tea, cooled
6 small dried apricots, chopped
4 dates, chopped
1 teaspoon cinnamon
Zest of half an orange
Juice of half an orange

The night before brew your tea. I simply used a couple of chai tea bags, infused them in 2 cups of hot water (in a saucepan) for 15 minutes or so and removed them. I then left the saucepan on the stove (heat free!) for the night, to cool. In the morning simply add the quinoa to the tea and bring to the boil. Once boiling, turn down to a simmer, add the remaining ingredients and simmer for 12 minutes. At this point I give it a fluff with a fork and then pop the lid back on for a couple of minutes. Top with whatever your heart desires. The left overs (assuming there are any) will keep in the fridge for 4-5 days.

Source: theholisticingredient.com

Posted on Leave a comment

Spicy Yoghurt Marinated Chicken Breast

spicy-yoghurt-marinated-chicken-breast

This marinade is enough for 2 small chicken breasts, or 1 large.

I reckon I love yoghurt more than anyone I know. I probably eat more of it than anyone I know too – every single day without fail, I get closer to the bottom of the container. So I was a little bit chuffed to be asked to be an ambassador for five:am yoghurt, because let’s be honest, supporting a product you love is anything but work. One of my promises to five:am is to create yoghurt inspired recipes so you’ll be seeing many more of these in time. I am determined to start bridging the gap between sweet and savoury yoghurt creations. This (quite clearly), sits firmly in the savoury camp. Easy as and tasty to boot.

You’ll need:
2 small/1 large chicken breast, sliced into strips
1/3 cup full fat natural or greek yoghurt (I used Five:am natural)
1 tablespoon lemon juice
1 teaspoon lemon rind
1/2 teaspoon paprika
1/2 teaspoon ground cumin
1/3 teaspoon ground turmeric
1 garlic clove, crushed
5cm piece fresh ginger, finely grated
Good pinch of salt and pepper

Mix the marinade ingredients in a bowl. Add the chicken and pop in for the fridge for at least 4 hours or over night. To cook the chicken, heat large pan until hot and add coconut oil. Cook on both sides for a few minutes, until golden brown. Do not turn chicken too often, this can make it tough. You could also pop this under the grill.

This chicken is delish for left overs – it goes beautifully with a lovely fresh salad, combined with steamed vegetables or with quinoa cooked in veggie stock.

Source: theholisticingredient.com

Posted on Leave a comment

Spicy Kimchi

spicy-kimchi

Kimchi is a spicy and tangy fermented food originating from Korea, where it is typically eaten with every meal, thus making it is a day-long family affair. Kimchi works well in fried rice, in spicy kimchi soup, or simply as a side dish. It is a great digestive aid to get the juices flowing before dinner. And, if you have never ventured into the world of fermented foods, Kimchi is a great place to start.

As I mentioned in yesterday’s post, fermented foods are a very important part of our diet and have been used in many cultures to preserve foods, aid digestion and promote the balance of health bacteria within the gut. Read more about the benefits of Fermented Foods here.

It is important to note that fermented foods (e.g. kimchi, sauerkraut) differ from cultured foods in that they ferment by way of bacteria naturally present in the food. Cultured foods (e.g. yoghurt, tempeh, kombucha) add bacteria and require a starter. Both fermented and cultured foods add ‘good’ bacteria to your digestive system, they just do so through differing processes.

With all this talk of bacteria, you’re probably wondering, “…am I going to get ill from this bacteria laden kimchi?” Let me assure you, it is only good bacteria we are talking about, and this recipe is completely safe. Keep it in the fridge once prepared though, ok?!

So, as promised, here is a delicious recipe for kimchi. Adapted from a book by Sandor Ellix Katz “Wild Fermentation”, this recipe was given to me by a delightful Gwinganna Naturopath, Sarah McKenzie, during my recent visit to the extraordinary lifestyle retreat. This is a great project to consider for the weekend as the recipe takes two days to complete.

You’ll need:
Sea Salt (or Celtic/Himalayan)
Half a large drum cabbage
12 radishes
2 carrots
1 onion
1 large chilli
1/2 bulb of garlic
3 tablespoons fresh ginger

Mix a brine of about 1 litre of filtered water and salt to taste (approximately 1 tablespoon). Taste as you go and add the salt gradually so as not to over salt. Stir to dissolve. The brine should be salty, yet palatable.

Coarsely chop the cabbage, slice the radishes and carrot (I like to use purple carrots). Let these vegetables soak in the brine overnight, covered with a plate to submerge. At this stage you may ad other vegetable if you so wish (seaweeds, green beans, beetroot etc).

The following day, prepare the herbs and spices. Grate the ginger, chop the garlic and onion, remove the seeds from the chilli and chop finely (or throw them in whole). Kimchi can absorb a lot of spice so go for it! Don’t worry to much about perfecting quantities.

Drain the vegetables that were soaking, and reserve the brine, If the vegetables taste too salty you can give them a quick rinse with cold water. If not salty enough, add more salt and give a good stir.

Mix the vegetables with the ginger/garlic/chilli/onion paste, then pack into clean glass jars (500ml or 1 litre). Pack tightly and press down on the vegetables until the brine rises. If necessary, add a little of the reserved brine to submerge the vegetables. If you chose to screw on the lid at this stage you may want to open it every few days in order to let out some pressure. Or you may chose to cover the top of the jar with a muslin cloth and affix with a rubber band.

Ferment in your kitchen or other warm place. Taste the kimchi every day. After about a week of fermentation, and when the mix tastes ‘ripe’, affix the lid and store in the fridge. Done! This recipe will keep for a couple of months, but let’s face it, it’s quite unlikely to last that long.

Speaking of gut health, if you’d like to know how to make your own coconut yoghurt at home, you can find the recipe in A Nourishing Morning. I was actually very surprised at how simple it was to make. Affordable too.

Source: theholisticingredient.com

Posted on Leave a comment

Cauliflower Toast

cauliflower-toast

Preparation Time: 5 minutes
Serves: 1

Every once in a while I plate up a new creation that leaves me wondering how on earth I got by for so long without it in my life. Much like the 5 minute 40 second egg you see adorning this dish. That recipe is on repeat every single week, without fail. This recipe creation was a suggestion by my friend Tash, and a mighty fine one at that. To all of you gluten-free peeps out there, let’s be honest – eggs are definitely better on toast. I don’t care what you say..that golden yolk needs toast – it needs something to dribble on!

Given many of us choose not to eat toast often (if at all), I’m hoping this alternative will win your hearts, as it did mine. Just don’t blink, you’ll miss it for sure.

You’ll need:
Half a head cauliflower, minimum
Good drizzle extra virgin olive oil
Spice of choice (I used a sumac spice rub, you could also use cumin or your spice of the moment!)

Heat your oven to 200C and line a tray with baking paper. Cut the cauliflower into 1.5 centimeter slices, utilising the core to hold it all together. Drizzle with olive oil, rubbing it all over, then rub generously with the spice. Place the ‘toast’ on the baking tray, and into the oven for 30 minutes at 200C (or until golden). Serve immediately, with 5 minute 40 second eggs, of course.

Source : theholisticingredient.com

Posted on Leave a comment

The 'Breakfast in Bondi' Smoothie

breakfast-in-bondi-smoothie

Makes: 1 generous serving

This quick and easy recipe pays tribute to my awesome years residing in Sydney, in particular that time spent living by the beach at Bondi. How I loved that life. Jumping out of bed in the morning for a Bondi to Bronte jog and a quick dip before pulling on a (pin striped) suit and heels to jump on the 389 bus to Bondi Junction (it was the 389 wasn’t in Bondi peeps?) and heading off to my corporate job. I remember those days so clearly. I had a flat at North Bondi with a best friend. We have such happy memories of sitting on our balcony on a balmy Saturday night with a big bag of cheesy CC’s or Doritos and (cask) Yalumba chardonnay – before hitting the local clubs. Clearly a little has changed in the 15 (or so) years since.

Tropical fruits are so much affordable and resplendent in Sydney – I recall eating mangos like an apple back then.

You’ll need:
1 cup coconut water
1 banana
1 mango cheek
1 heaped tablespoon natural or Greek yoghurt (I use five:am organic yoghurt
1 dessertspoon ground flax seeds
1 dessertspoon chia seeds
1 heaped teaspoon maca powder
Juice 1/2 lime

Throw all ingredients into a blender and blend until smooth. Leave to sit for at least 20 minutes to allow the chia seeds to soften and thicken the smoothie.

For more simple, summery smoothie inspiration, you’ll find some scrumptious ideas in my eBook, A Nourishing Kitchen.

Source: theholisticingredient.com

Posted on Leave a comment

Grilled Peach, Proscuitto & Rocket Pizza

Peach-Pizza

Serves: 2

You’ve got friends (or even a special someone) coming around for dinner and drinks on Friday, friends (or that special someone) who appreciate good grub (for the non Aussies, grub = food) and expect a little more than spag bol. The problem is, you get home from work at 6.30pm and you’re worrying about delivering a frazzle-free meal to the table by 7.30pm (whilst remaining the cool, calm and collected home chef that you are).

Fear not my friends, because I have just the answer. A meal that is relaxed enough for a Friday night dinner yet interesting enough to garner acceptable nods from your guests. It’ll also satisfy any gluten free requirements. Bingo!

Continue reading Grilled Peach, Proscuitto & Rocket Pizza