Posted on Leave a comment

Vanilla Infused Sesame Seed Milk

vanilla-infused-sesame-milk

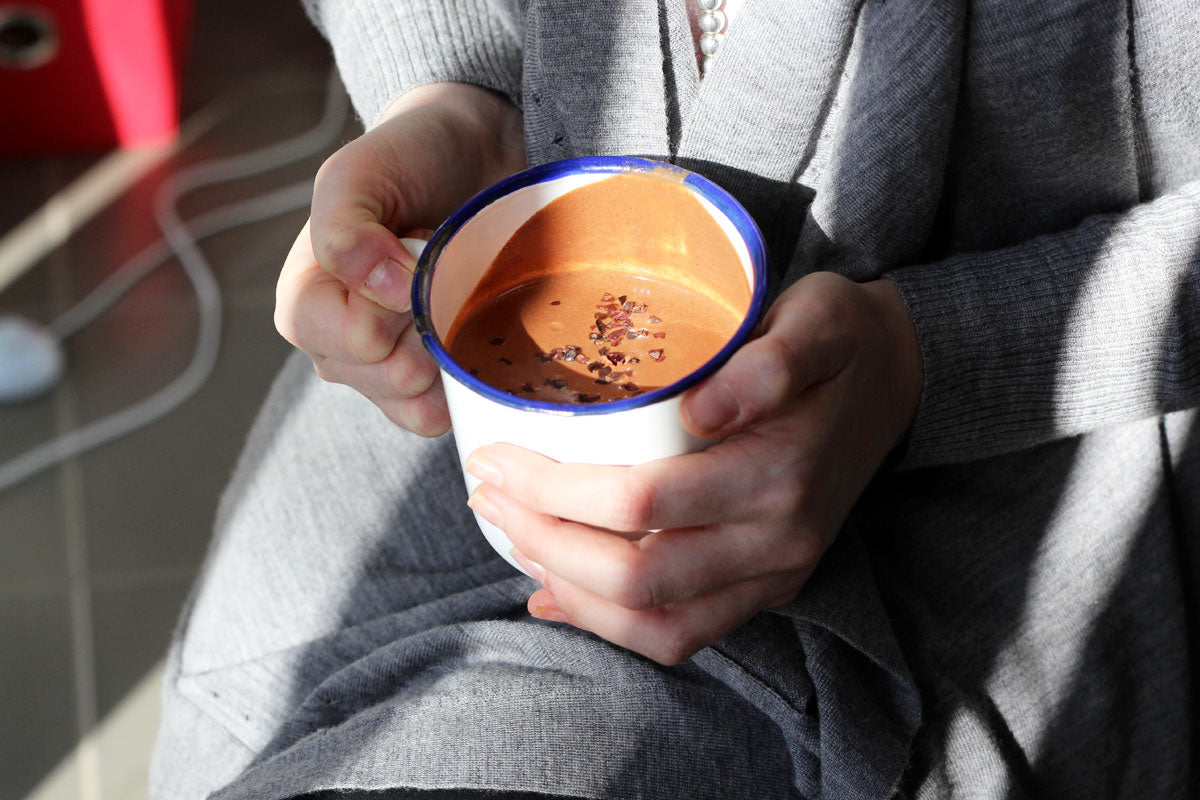
Makes: about 3 cups of milk and a large cup of sesame pulp.

Every single thing happens for a reason; there is a blessing in every challenge; always see the positive in the negative….I could go on all morning! The point here is that my Vanilla infused sesame seed milk is indeed a blessing from a challenge…that being I purchased the hugest bag of sesame seeds recently (self service, got a bit carried away), got home and wondered on earth I was going to do with all of these little seeds. I’m not talking 1/2 cup here, I had about 6 cups – now that’s a challenge! So, I put my thinking cap and Hey Presto! We have this lovely creamy, vanilla infused, dairy and nut-free milk.

Firstly though, let’s not ignore the humble sesame seed and it’s nutritional value. It may be tiny but my goodness it packs a punch (it also turns into tahini…..and oh my goodness me, my teaspoon LOVES a bit of tahini).

Sesame seeds are a great source of manganese, copper (which provides relief from rheumatoid arthritis), calcium (helps prevent PMS, colon cancer, osteoporosis), magnesium (supports vascular and respiratory health), iron, phosphorous, vitamin B1, zinc (supports bone health) and dietary fibre. Significantly they also contain two unique substances called sesamin and sesamolin which have been shown to have a cholesterol lowering effect in humans. Sesamin is also said to help protect the liver from oxidative damage.

You’ll need:
1 cup sesame seeds, soaked overnight in water
4 cups filtered water
Seeds of one vanilla pod
Sweetener of choice, to taste (I used 2 heaped teaspoons maple syrup)
Pinch of sea salt

Throw all of the above ingredients in your high powered blender and blend for 1-2 minutes, depending on the quality of your blender. You want it to be really smooth. Pour the mixture through a nut bag or strainer into a bowl, straining really well until you get all the liquid out of the pulp. Store in the fridge in an air tight bottle or jug for 3-5 days. The pulp can be dehydrated and used as meal (as you would almond meal…I’ll post a recipe for this next week). You could also add it to porridge, soups etc.

If you would prefer your pulp not to have a vanilla flavour, don’t hesitate to make the milk without the vanilla and sweetener, strain it and then pop the milk back into your blender with those ingredients. If you choose to heat this for a hot drink I discovered yesterday that it doesn’t curdle (like my almond milk does). Perfect!

Source: theholisticingredient.com

Posted on Leave a comment

Quinoa Porridge Infused with Chai Tea and Orange

quinoa-infused-with-orange-and-chai

Serves: 3

I do believe this is now the sixth quinoa recipe I have posted – clearly I hold it in very high esteem. Here’s hoping I am not the quinoa Lone Ranger because this is a beautiful take on the Steaming Hot Quinoa porridge which has undoubtedly been one of the most popular recipes on this blog.

You’ll need:
1 cup quinoa, well rinsed
2 cups of chai tea, cooled
6 small dried apricots, chopped
4 dates, chopped
1 teaspoon cinnamon
Zest of half an orange
Juice of half an orange

The night before brew your tea. I simply used a couple of chai tea bags, infused them in 2 cups of hot water (in a saucepan) for 15 minutes or so and removed them. I then left the saucepan on the stove (heat free!) for the night, to cool. In the morning simply add the quinoa to the tea and bring to the boil. Once boiling, turn down to a simmer, add the remaining ingredients and simmer for 12 minutes. At this point I give it a fluff with a fork and then pop the lid back on for a couple of minutes. Top with whatever your heart desires. The left overs (assuming there are any) will keep in the fridge for 4-5 days.

Source: theholisticingredient.com

Posted on Leave a comment

Spicy Yoghurt Marinated Chicken Breast

spicy-yoghurt-marinated-chicken-breast

This marinade is enough for 2 small chicken breasts, or 1 large.

I reckon I love yoghurt more than anyone I know. I probably eat more of it than anyone I know too – every single day without fail, I get closer to the bottom of the container. So I was a little bit chuffed to be asked to be an ambassador for five:am yoghurt, because let’s be honest, supporting a product you love is anything but work. One of my promises to five:am is to create yoghurt inspired recipes so you’ll be seeing many more of these in time. I am determined to start bridging the gap between sweet and savoury yoghurt creations. This (quite clearly), sits firmly in the savoury camp. Easy as and tasty to boot.

You’ll need:
2 small/1 large chicken breast, sliced into strips
1/3 cup full fat natural or greek yoghurt (I used Five:am natural)
1 tablespoon lemon juice
1 teaspoon lemon rind
1/2 teaspoon paprika
1/2 teaspoon ground cumin
1/3 teaspoon ground turmeric
1 garlic clove, crushed
5cm piece fresh ginger, finely grated
Good pinch of salt and pepper

Mix the marinade ingredients in a bowl. Add the chicken and pop in for the fridge for at least 4 hours or over night. To cook the chicken, heat large pan until hot and add coconut oil. Cook on both sides for a few minutes, until golden brown. Do not turn chicken too often, this can make it tough. You could also pop this under the grill.

This chicken is delish for left overs – it goes beautifully with a lovely fresh salad, combined with steamed vegetables or with quinoa cooked in veggie stock.

Source: theholisticingredient.com

Posted on Leave a comment

My thoughts on protein powder (plus an apple tea cake recipe)

Protein-Cake

My thoughts are this – most protein powders are not our friends. The vast majority seem to be full of ingredients made in a laboratory, ingredients that are highly processed and full of synthetic ingredients (including artificial sweeteners) that are toxic to our bodies. If what you are putting on your fork is not actually adding value to your health in the long term, why would you eat it? By choosing whole foods, as close to nature as possible, you are nourishing your body with the goodness it needs and deserves. But there is indeed a ‘but’. Not all protein powders are created equal and my personal opinion is that there is a place for some high quality protein powders on the market today.

So why do I include a protein powder in my diet anyway?
Well mainly for variety. My body needs high quality protein in at least two out of three main meals each day (I couldn’t be vegan if I tried…and I have). My ‘high quality’ options are eggs, chicken, red meat and a little fish (I have had terrible trouble with heavy metals in my body so am cautious of eating too much fish) and occasionally I tire of these options. For that reason, I’ve always chosen 100% whey protein to throw into a smoothie and create a full meal for breakfast or lunch; until that is, I discovered an awesome new protein superfood range by Think Vitality Nutrition. These guys use protein blends that are whole foods, with a focus on natural nutrition (seemingly revolutionary in the protein powder market today). They use quality ingredients and combine them to create complete super food sources. It’d be remiss of me not share my find quite frankly!

A little about TVN and their protein sources.
TVN is the brainchild of Vicky and Tahi Reihana. Vicky is a certified holistic health coach, personal trainer, and Tahi a fitness industry lecturer, former international rugby player and strength and conditioning coach. Both have owned gyms in their time so their knowledge and experience equips them to devise a superior product within the health, wellness and fitness industry. TVN use both whey and pea protein within their superfood blends, and it is the quality of these ingredients (and those they combine them with) that sets this brand apart.

Whey Protein Isolate
The whey is sourced from New Zealand pasture fed, hormone free, raw cows milk. Free from chemicals, additives and artificial sweeteners. It is low allergen, therefore suitable for those with gluten and food intolerances. The whey is easy to digest, gentle on the stomach and promotes gut health.

Pea Protein Isolate
The pea protein is a 100% natural plant based protein derived from golden peas. It is easily absorbed because it has the most balanced amino acid profile of any plant based protein. Pea protein is ideal for vegetarians and vegans who are looking to incorporate quality protein into their diet.

What I love in particular about this range is the beautiful list of whole foods in their blends – jump onto their website and check out their coconut or cinnamon superfood protein powders, for example.  This range is perfect for quick to prepare and easy to devour meals or between meal snacks. And not only are they great to include in smoothies, but they’re also amazing to bake with. Check out our latest cake recipe, if you may.

Coconut & Apple Pro-TEA-n Cake with Cinnamon Glaze.

For the tea cake:
2 cups almond flour
1 cup TVN WPI coconut superfood blend
2/3 cup coconut nectar
1/4 cup coconut oil, melted
2 teaspoons cinnamon
1 teaspoon cardamom
1/2 teaspoon baking soda
3 eggs
2 apples, peeled and cored
Juice of one lemon

For the cinnamon glaze:
2 tablespoons coconut oil, melted
2 tablespoons coconut cream
2 tablespoons coconut nectar
1 tablespoon cinnamon

Preheat your oven to 180 degrees celsius. Grease a round cake tin (approx 25cm diameter) with coconut oil, and line the base with baking paper.

Roughly dice the apples and place them in a bowl, cover them in the lemon juice, set aside. Combine the dry ingredients (almond meal, Think Vitality Nutrition Coconut Protein Blend, cinnamon, cardamom and baking soda) on one bowl, and the wet ingredients (coconut nectar, coconut oil and the eggs) in another. Whisk the wet ingredients. Add the wet mix to the dry and fold through the apples.

Spoon the cake batter into the baking tin and place in the oven for 20 minutes or until a skewer inserted comes out clean.

To make the glaze, simply combine the above listed ingredients and stir to remove any lumps. Drizzle over the slices of cake as you serve.

Note: You may substitute coconut flour for the WPI coconut protein blend.

Source : www.theholisticingredient.com

Posted on Leave a comment

The Maca Hot Chocolate

If a hot water bottle was a drink it’d have to be a hot chocolate don’t you reckon? Comforting, nourishing, cosy, delicious, warming.. I dare say that’s enough adjectives for one sentence, but it’s fitting don’t you think?

So then, take one home made hot chocolate and combine that with the nourishing and energy boosting benefits of maca and you’ve got a winter warming drink that will not only tick all the deliciousness boxes but it’ll work wonders for your health at the same time.

Today’s recipe is fresh from the ‘a sip and a slurp’ section of my morning inspired whole foods recipe eBook A Nourishing Morning (where you’ll find 74 other recipes for drinks, healthy snacks, brunches and breakfasts).

Oh and a word of warning, it’s quite rich (just as I like it), so feel free to add a little hot water to the concoction at the end if you need.

Serves 2
1 ½ cups almond or sesame milk
½ cup coconut milk, canned or fresh
3 tablespoons cacao powder*
1 tablespoon maca powder
1 teaspoon rice malt syrup (or sweetener of choice)
½ teaspoon ground cinnamon
½ teaspoon vanilla powder (or essence)
Pinch sea salt Cacao nibs to garnish

Place all ingredients except for the cacao nibs into a small saucepan over medium heat. Gradually heat the liquid to a gentle simmer for a couple of minutes. Do not allow the liquid to boil.

Remove from heat and pour into two mugs. Garnish generously with cacao nibs.

Maca Hot Chocolate Recipe

Once you’ve overdosed on this hot chocolate (which of course you won’t, because we are all about moderation, aren’t we?), you had better move onto my Golden Turmeric Milk, if not already. It’s a winner grinner.

I’m keen to know from you – what other flavours sit well in a hot chocolate? I was thinking a drop of peppermint essential oil might be rather delicious? Or wild orange? I’d love to hear your thoughts. 

Source: theholisticingredient.com

Posted on Leave a comment

Mashed Vegetable & Quinoa Fritters – a leftovers delight!

Vegetable-quinoa-fritters

You will never (ever) hear me dissing leftovers. Leftovers are the cornerstone of most of my kitchen creativity, it’s how some of my finest creations have come about as a matter of fact. I open my fridge to a ‘problem’ in need of a solution (the ‘problem’ being eating the same left over food every day until it’s gone). The solution is found when your creative brain kicks in and you come up with a dish that makes taste buds sing with delight and relief.

On that note, say hello to my (now upgraded) mashed veggies and all the inspiration you need to prepare enough food for leftovers in mind.

If you’ve left over mashed veg and cooked quinoa in the fridge this recipe will take you 5 minutes to prep and about 8-10 minutes to cook. Dinner in 15 – WIN!

Recipe notes: Go nuts with any herbs and spices you lean towards. Cumin or paprika would be a lovely addition in my book. If you would prefer to omit the egg, you may like to use our easy egg substitutions chart for an alternative. Perhaps try a chia egg? The ground flax will also help keep the fritters together in the pan.

Makes 4 large fritters, Serves 2

1.5 – 2 cups mashed vegetables (you could also mash left over roast veg)
3/4 cup cooked quinoa
1/4 cup quinoa flour
1 egg
1 heaped handful coriander or parsley leaves, torn
1/2 teaspoon ground turmeric
1/2 teaspoon chilli powder or flakes
1 heaped tablespoon ground flaxseed
A good pinch of sea salt and pepper to taste
Coconut oil, for frying

Place a large frying pan on the stove, medium heat and allow to warm.

In a bowl combine all of your ingredients, except for the coconut oil. If your mixture is too wet add some more quinoa flour – you need to be able to roll the fritters into balls in your hands. Flatten the balls as I have in the photo.

Add a heaped teaspoon of coconut oil to your hot pan. Carefully place your fritters into the pan and allow to cook for approximately 4-5 minutes on one side or until turning a lovely golden brown. Carefully turn the fritters over and cook for a further 4-5 minutes on the other side.

Serve as is or with a lovely fresh salad. A dollop of homemade relish is always a wonderful addition. Oh and I just had a thought! How about this dairy free kale pesto? YUM!

Vegetarian Fritters with Quinoa

If you’re looking for more leftover veggie ideas, you may like my Green Pizza Omelette or my Quinoa, Goats Cheese and Roast Vegetable Frittatas. For another cooked quinoa leftover idea, try my Mediterranean Inspired Salmon Fish Cakes.

As always, any and all feedback is hugely welcome and please, if you’ve any great leftover veggie ideas to share we are alllll ears!


Source: theholisticingredient.com

Posted on Leave a comment

Ten minute Almond Meal, Flaxseed and Cinnamon Hot Cakes

You know, I ummed and ahhed about sharing this recipe; I’ve done similar versions before and questioned whether I was bringing enough variety to your weekly menu. I also questioned its simplicity. Then I reconsidered, because it’s exactly what I am trying to do on this website – show you how easy it is to make real, simple, uncomplicated food; food that doesn’t require bells and whistles and knife skills training; food that still looks like real food when you eat it.

In any case, SIMPLE is where it needs to be in my kitchen or it just doesn’t get made.

It’s a very good thing I decided to take a couple of photos of my breakfast the day these babies came into the world isn’t it, because here we are.

Almond meal flaxseed hotcakes

Serves 2, makes 6-8 hot cakes.

1/2 cup almond meal
2 tablespoons ground flaxseed
2 eggs
1/4 – 1/2 cup milk of choice (I used coconut)
1 tablespoon maple or rice malt syrup (or sweetener of choice, to taste), optional
1 teaspoon ground cinnamon
Pinch sea salt
Coconut oil, for frying

Pop a frying pan on medium heat on the stove.

Whisk or beat your eggs until fluffy, then combine all other ingredients (start with 1/4 milk and add as necessary) and continue to whisk until well combined. Taste and add more sweetener if required. The mixture needs to be like pancake batter, just pourable.

Add a heaped teaspoon coconut oil to your hot pan. Pour or spoon pikelet sized hotcakes onto your pan and cook for approximately 3 minutes, until bubbles start appearing. Using an egg slice, gently flip them over and cook for a further 2-3 minutes or until golden either side.

They would be beautiful layered with banana and/or fresh berries. Here I’ve layered them with coconut yoghurt and paw paw. It’s worth mentioning that they are best devoured quickly because as you can see, mine are about to swim away..

ten minute hot cakes

Very soon I am going to share my other go-to vegan hot cake recipe, for those of who who prefer an egg free option.

I’m keen to know from you though, what’s your simple go to breakfast option (that isn’t out of a packet)?  Let’s create some inspiration for all. Personally I love my smoked salmon and avocado on toast. Takes no time at all and sustains me until lunch. 


Source: theholisticingredient.com

Posted on Leave a comment

CURRIED RED LENTIL AND POTATO SOUP

mayawilson-red-lentil-soup

I’m not really sure what the difference is between a curry and a soup, but this dish – built on red lentils and potatoes, with bright Thai curry paste and tangy non-dairy yogurt — falls into that grey area. It would be just as good on a plate with rice as it would by itself in a bowl.

Technically, curry doesn’t even exist. In India, the word curry apparently just refers to a gravy or sauce. How do I know this? Why, from the unofficial website (notacurry.com) dedicated to striking down the flow of misinformation around Indian cuisine! “Curry is a misnomer that trivializes the complex and heterogeneous characteristics of Indian cooking and overlooks the Indian subcontinent’s highly diverse culinary landscape.”

…So whatever you want to call it, this dish actually draws influence from lots of different regions. The red lentils and potatoes are very Indian, but I’m using bright Thai red curry paste as well as non-dairy yogurt (which is a first for this blog) to create layers of flavor in this super-easy, creamy, spicy dish.

red_lentil_curry

red_lentil_curry_top

Makes: 4 servings

Ingredients:

  • 1 tablespoon olive oil
  • 1 yellow onion
  • 2-3 stalks celery
  • 2 small carrots
  • 3 medium-size red potatoes
  • 3 tablespoons Thai red curry paste*
  • 1/4 teaspoon ground coriander
  • 1 red chili
  • 1 cup red lentils
  • 3+ cups vegetable broth
  • 8-10 oz non-dairy (coconut or soy) yogurt
  • 3 limes
  • 1/4 cup cilantro
  • Salt and pepper, to taste
  • Jasmine rice, for serving

* I use the Thai Kitchen brand red curry paste, which is widely available in the states and is vegan, but I’ve heard that the European version has fish sauce, so be sure to double check.

Step One

Mince the mirepoix (onion, celery, carrot) and add to a large stockpot with a tablespoon of olive oil and a dash of salt and pepper. Allow the veggies to soften for about 5 minutes, then add in all of the curry paste, the coriander, and the potatoes (cut into small chunks) and all/some of the red chili (minced) depending on how spicy you want it. Stir well to incorporate the curry paste and give another 5 minutes to simmer.

Step Two

Rinse and sort the lentils, then add them into the pot along with 3 cups of veggie broth (for now, more may be needed later). Bring to a simmer, cover, and allow to cook for at least 30 more minutes until the potatoes are soft and fully cooked – stirring occasionally. Feel free to add more salt, spices, curry paste, or vegetable broth, if needed.

If serving with rice, begin preparing that now as well.

Step Three

When the potatoes are soft, remove from the heat and stir in the juice of 1-2 limes and about 6 oz of coconut milk yoghurt. Ladle into bowls, alongside the rice (if using) and top with chopped cilantro and a dollop of the remaining coconut milk yogurt.

red_lentil_curry_soup

Posted on Leave a comment

BUDDHA BOWL WITH TASTY CHICKPEAS AND RED PEPPER CHIMICHURRI

buddha

I’m not sure what a Buddha Bowl even is anymore. Back when I posted my original buddha bowl recipe a few years ago, my understanding was that it meant a bowl of finely-chopped vegetables tossed with a grain like rice or quinoa. But now, if you do a search for buddha bowl, it seems to be used for any vegetarian recipe served in a bowl. Hmm.

However, I’m still holding onto my definition. I think something great happens when you chop your veggies super-fine and toss them with a grain and some seasonings. Every bite has a little of everything and it tastes so fresh and satisfying. For this new recipe, we’re taking that template to another level. It’s starts with the basics – quinoa with chopped veggies – and then we’ll add some sweet & savory sautéed chickpeas and top everything with a killer pureed sauce of red pepper and parsley (much like a chimichurri sauce). Everything can be whipped up in under 30 minutes for a dinner + some leftovers the next day.

chickpeabuddha
Makes: 4 servings

Ingredients:

  • 3 cups cooked white quinoa
  • 4+ cups chopped kale
  • 4 green onions
  • 1 avocado
  • 1/4 cup pumpkin seeds
  • 2 15 oz cans chickpeas
  • 1 1/2 tablespoons maple syrup
  • 1/4 teaspoon each (to start): smoked paprika, cayenne, garlic powder, cumin, sea salt
  • 2 red bell peppers
  • 1/3 cup fresh parsley
  • 2 cloves garlic
  • 1 tablespoon olive oil
  • 2 tablespoons red wine vinegar
  • Salt and pepper, to taste

Prep: cook some quinoa according to package instructions. If you start with about 1 1/2 cups of dry quinoa and 3 cups of water, you should have just about the right amount.

Step One – The Chickpeas

To start, let’s make the sweet and spicy chickpeas that add so much depth and flavor to this buddha bowl. Rinse and drain two cans of chickpeas (or a fresh equivalent) and toss them into a skillet with a drizzle of maple syrup and a few dashes of each of the spices mentioned (it’s hard to say exactly how much to use, just start with a little and see how it goes). Warm over medium-high heat and toss the pan occasionally to ensure even coating. After about 5 minutes, the chickpeas should begin turning darker and the seasonings will start to stick. At that point, give them a taste and add any more spices as needed. Then, remove from the heat and set aside.

Step Two – The Chimichurri

Slice 1 1/2 red bell peppers into strips, place them on a baking sheet (saving the other 1/2 pepper for garnish) , and pop them under your oven’s broiler for 5-7 minutes, until the tops just begin to char. When done, allow to cool slightly then combine in a food processor with the parsley leaves, garlic cloves, olive oil, red wine vinegar, and some salt and pepper. Pulse just a few times until you have something resembling a salsa (stop before you have a smoothie!). Taste and adjust the flavors as needed.

Step Three – Everything Else

With the two big components out of the way and the quinoa finished cooking, the salad is easy to finish. Simply chop the green onions and kale into very small pieces and dice the avocado and remaining bell pepper. Then add everything except the chimichurri (chickpeas, quinoa, kale, green onions, avocado, bell pepper, and pumpkin seeds) into a large bowl and toss to combine. Serve (room temperature and chilled both work well) in bowls with a big spoonful of the chimichurri on top.

chickpeabuddhatop


Source: oneingredientchef.com

Posted on Leave a comment

THE BUFFALO TEMPEH RANCH WRAP

buffalo

One of my favorite flavor combos in the whole world is buffalo + ranch, but this is surprisingly my first attempt at putting those two flavors together in one of my own recipes. I couldn’t be happier with it. The spicy buffalo-coated tempeh strips and the shredded greens coated with cool cashew-based ranch is incredible. Throw in some avocado for good measure and wrap it all in a tortilla for one delicious lunch.

The cool thing about this recipe is that you can make it pretty much anyway you want. It’s just about perfect as it is, but you can change it up in many ways. If you want to make it into an awesome bowl, just sub rice or quinoa for the tortilla. Want to use cauliflower instead of tempeh? No problem. Feel free to freestyle this one as much as you want and it will still come out amazing.

BuffaloWrap

Makes 4 wraps

Ingredients:

  • 4 large whole wheat tortillas
  • 8 oz block of tempeh
  • 1/2 cup+ buffalo sauce
  • 2+ cups shredded lettuce
  • 2+ cups red cabbage
  • 1 ripe avocado
  • 1/2 cup raw cashew pieces
  • 2 tablespoons nutritional yeast
  • 2 tablespoons fresh parsley
  • 1 tablespoon fresh chives
  • 1 teaspoon garlic powder
  • 1 teaspoon apple cider vinegar
  • Salt and pepper, to taste

BuffaloWrapOpen

Prep: Soak the 1/2 cup raw cashews for at least an hour before blending. Also preheat the oven to 350º F.

Step One

In a high-powered blender, make the ranch sauce by combining the cashews (drain the soaking water), 1/2 cup fresh water, nutritional yeast, parsley, chives, garlic powder, apple cider vinegar, and a shake of salt and pepper. Blend until smooth, then give it a taste and adjust anything as needed to get a creamy, slightly-sour vegan ranch sauce. This can be made ahead and stored for several days if needed.

Step Two

To make the buffalo pieces, slice the tempeh lengthwise into long strips, line them along a baking dish, and coat both sides with at least 1/4 cup buffalo sauce. Bake for about 5 minutes until the sauce begins to stick to the outside and absorb into the tempeh. Add more buffalo sauce, flip the tempeh, and bake again – getting tons of flavor baked onto the outside of the pieces. Allow to cool and set aside until ready to make the wraps.

Step Three

To make the wraps themlselves, warm a large tortilla in the oven or microwave until more pliable, add a handful of both shredded lettuce and shredded red cabbage, then drizzle on a bunch of the ranch sauce. Line with a few avocado pieces and 2-3 tempeh pieces. Drizzle with a little more buffalo sauce and ranch sauce, then fold in the ends and roll lengthwise. Slice in half and serve!

Note: all the pieces can be made ahead of time but it’s best to prepare the wraps just before serving, as the sauces will make them soggy if saved for too long.

BuffaloWrapPlate

Source : oneingredientchef.com